How to merge similar blog posts means combining overlapping articles into one stronger page instead of letting them compete. This matters for SEO because similar posts can split rankings, confuse internal links, and weaken topical focus.
In this guide, you will learn how to choose the right URL, combine useful content, redirect old posts, and track SEO performance after the merge.
What Does It Mean to Merge Similar Blog Posts?
Merging similar blog posts means taking two or more overlapping articles and turning them into one stronger article. This process is also called content consolidation, SEO content consolidation, or blog post consolidation.
For example, a site may have one post about what is search intent and another post about search intent examples. If both posts answer the same user intent, one stronger guide may perform better than two weak pages.
However, merging is not the same as copying both articles into one long post. Instead, you need to remove duplicate content, keep the useful sections, improve the outline, and make the final article easier to understand.
When How to Merge Similar Blog Posts Makes Sense
You should merge blog posts when two pages target the same keyword intent. This often happens when your site has older articles, near-duplicate content, or posts created from very similar keyword variations.
Merge similar posts when:
- both pages rank for similar GSC queries
- one page has traffic and the other has useful sections
- both articles target the same search intent
- internal links are split between both posts
- one article is thin but still useful
- Google seems unsure which URL to rank
Do not merge posts only because the topics are related. For example, keyword research checklist and how to find low-competition keywords can support each other, but they should stay separate if the search intent is different.
Step 1: Find Similar Blog Posts
Start with a content audit. Look for pages that have similar titles, overlapping H2 sections, duplicate content, or the same target keyword.
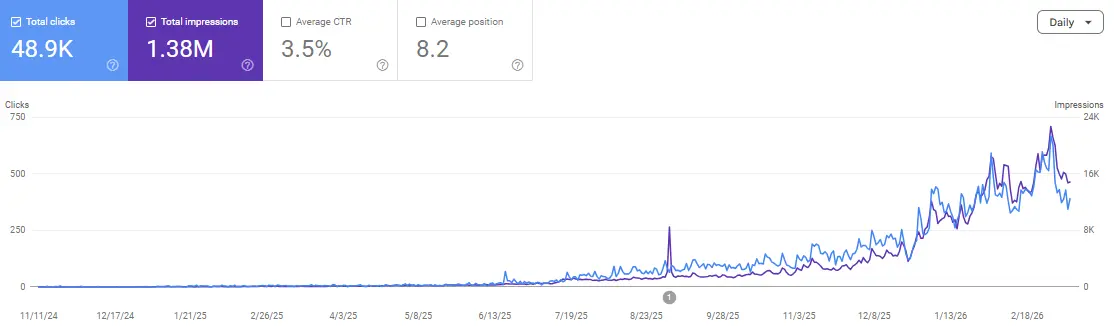
Use Google Search Console to check whether two URLs get impressions from the same queries. The Performance report shows clicks, impressions, CTR, and average position, which makes it useful for spotting overlap between pages.
Step 2: Choose the URL to Keep
Before you consolidate blog posts, choose the strongest URL. This is the page that will become the final merged article.
Keep the URL that has:
- more organic traffic
- stronger backlinks
- better rankings
- more internal links
- cleaner slug
- better search intent match
- stronger historical performance
In many cases, the older URL is safer to keep if it already has backlinks and traffic. However, a newer URL may be better if it has a cleaner slug and stronger content structure.
Step 3: Build One Stronger Article Outline
Next, build a clean outline before combining the content. This prevents the merged article from becoming messy or repetitive.
Use this process:
- Choose one primary keyword.
- Review the top-ranking pages.
- Keep useful sections from both posts.
- Remove repeated explanations.
- Add missing examples, screenshots, FAQs, or tables.
- Rewrite the introduction with a direct answer.
- Make the final article flow like one complete guide.
This step is important because merging similar content should improve content quality. If the new page only becomes longer but not clearer, the merge may not help.
Step 4: Move Useful Content Into the Main Post
After the outline is ready, move the best parts from the weaker post into the main URL. Keep content that adds original value or improves the search intent match.
Keep:
- unique examples
- helpful screenshots
- useful tables
- FAQs
- original tips
- sections with GSC impressions
- internal link opportunities
Remove duplicate paragraphs, outdated sections, filler text, and off-topic explanations. In addition, refresh the title, meta description, H2s, and intro so the merged post feels like one complete article.
Step 5: Use a 301 Redirect From the Old Post
After updating the main post, redirect the weaker URL to the merged article. Use a 301 redirect when the old article is permanently replaced.
Google explains that certain redirects are used as a signal that the redirect target should be treated as canonical. Therefore, a permanent redirect helps users and search engines move from the old URL to the stronger page.
Step 6: Update Internal Links and Canonical Signals
Once the redirect is live, update internal links so they point directly to the merged article. This avoids unnecessary redirect chains and sends clearer signals to the main URL.
Also check the canonical URL. Google explains that canonicalization is the process of selecting the representative URL for duplicate or similar content, and site owners can use canonical signals to help Google understand the preferred page.
Update:
- internal links
- related post blocks
- menu links if needed
- old CTA links
- image links
- sitemap URLs
- canonical tags
This step protects URL consolidation and helps backlink preservation if the old article had useful links.
Step 7: Track Results After the Merge
After the merge, track results in Google Search Console. Do not judge the result too quickly because search performance can fluctuate after a content update.
Check these metrics:
- clicks
- impressions
- CTR
- average position
- indexed URL
- crawl errors
- queries gained
- queries lost
Compare performance after 2 to 4 weeks, then again after 6 to 8 weeks. If clicks or rankings drop hard, check whether the merge removed an important section, changed search intent, or redirected the wrong URL.
Common Mistakes to Avoid
Many SEO problems happen because the merge is rushed. As a result, the final page may lose important content or send mixed signals.
Avoid these mistakes:
- merging posts with different search intent
- deleting the weaker post without a redirect
- keeping duplicate content live
- choosing the wrong URL to keep
- ignoring backlinks
- copying both posts together without editing
- forgetting internal links
- using canonicals and redirects inconsistently
- judging results after only a few days
Instead, follow a clean workflow. Audit first, choose the main URL, combine useful sections, redirect the old post, update links, and monitor results.
FAQs About How to Merge Similar Blog Posts
Can merging blog posts hurt SEO?
Yes, it can hurt SEO if you merge posts with different search intent, remove useful sections, choose the wrong URL, or forget to redirect the old post.
When should I merge similar blog posts?
Merge similar blog posts when they target the same intent, rank for overlapping queries, or split internal links and traffic between two weak pages.
Should I delete or redirect the old blog post?
Usually, redirect the old post to the merged article with a 301 redirect. Delete only when the page has no value, no backlinks, and no useful replacement.
How do I choose which URL to keep?
Keep the URL with stronger traffic, backlinks, internal links, rankings, cleaner slug, and better search intent match.
Use a 301 redirect when the old page is permanently replaced. Use canonical tags when similar pages must stay live but one should be treated as the preferred version.
How long does it take to see results after merging posts?
Review early movement after 2 to 4 weeks, then check again after 6 to 8 weeks. However, timing can vary based on crawling, competition, and content quality.
Conclusion
Learning how to merge similar blog posts helps you turn overlapping content into one stronger SEO asset. Instead of letting similar posts compete, choose the best URL, combine useful content, remove duplication, and redirect the weaker post.
For safer merge blog posts SEO, update internal links, check canonical signals, refresh the title and headings, and track clicks, impressions, CTR, and average position in Google Search Console. This process protects organic traffic while improving content focus.
Want help reviewing similar blog posts before merging them? Join the Scale Xpert Discord.